Showing posts with label Armstrong.. Show all posts

Sunday, March 22, 2009

My Lab Assistants

While constructing the Armstrong Twin I had for delightful assistants who were a great help to me during this project.


This is Sailor.  

Try soldering while there are four of these guys down there doing the snout thing on your elbow and demanding attention right now.


Skeeter, Princess Pink, and the dog who will remain nameless.

Completed Armstrong Twin Photos and Final Thoughts


Well there you go.  The thing itself completed. 

This project was for me fairly easy and a good way to get back to nuts and volts electronics after many years away.  This not a bad first build for any one just go slow and use some care in assembly.    If I could do anything differently it would be pay more attention to compenent position prior to soldering anything and give a little space around the penetrations in the casing to allow for washers and nuts.  

The soldering also leaves something to be desired.  It could be more cleanly executed and the excess flux needs to be removed.  But the ultimate test is does it work and it most certainly did on the first try so what more needs to be said? 

Armstrong Twin Construction #3


Per recommendations at BYOC board I prepared the True Bypass Footswitch with jumpers.


Next I prepared the power jack.  This was soldered on the vise and then the leads were fed in through the hole in the case.  


A little fuzzy but you can see how the Output jack is connected to the Footswitch.


The completed assembly.

Armstrong Twin Construction # 2


This is the board with all components in place (except that busted diode).  


A close up of the switch sockets after mounting.  Since th eswitch and toggle switch help hold the board in place they are mounted on the back of the board.   One note of caution: The holes are large in relation to the leads and if you are in cautious with the solder you'll end up with a bunch of it stuck up underneath the switch shorting out who knows what.  It's a major pain in the ass to remove.  Also getting all the pins lined up was a little tricky but patience and a pair of needlenose pliers will get it all right.


The completed board assembly with switch in place.


Armstrong Twin Construction


This is the board.  The first step in assembly is to populate it with components.  The directions aren't 100% clear but seem to indicate soldering components after each component type is placed in the board.  This view shows the first step with the diodes in and ready to be soldered.


As I was taught way back when the leads are crossed at about 45 degrees on the back.  This helps keep the parts in place before soldering and supposedly makes the joint more reliable.  You will also note some darks spots on the board.  That is excess flux but care is required lest you burn the board or worse yet cause the pads to lift from the board.


Of course I screwed up the very first joint (the large diode on the right mid board).  I had to remove this diode and replace it.  Fortunately the 1N24A is very common component and was available at the local Fry's.  


A close up of the sad corpse of the diode.

Monday, March 16, 2009

Armstrong Twin #4

No pictures today, it's late, I'm tired and GIMP is kind of a pain in the ass.

I'm actually a couple of days behind.  Yesterday I populated the circuit board, cracking a diode in the process. 

So today had to troop down to Fry's to locate a replacement part and some cleaning supplies.

Got the board mounted and about half the wiring harness built.  Will complete tomorrow and hopefully finish up.

Edited to correct spelling.

Sunday, March 15, 2009

Armstrong Twin #3 -The Workspace


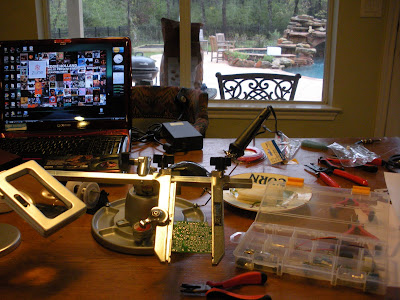
Above is the workspace I am using today.  

A lot of folks think that they need a special place to work.  In fact this can frequently become an obstacle to attaining some long desired goal.  We can can become bogged down believing that if only I have the perfect music room/workshop/study/garage/tools I will be able to write that perfect song/build that doohickey/novel/classic car.  This is (mostly) bullshit.  Stephen King wrote his first novel in his laundry room, JK Rowling wrote in coffee shops, Piers Anthony does all his first drafts on yellow legal pads, Sargent Pepper was a 4 track album, and some of the most beautiful art and scuplture has been produced without the least access to modern tools and chemistry.  Most important is the desire to succeed.

In my case I am living an itinerant lifestyle until summer.  My home is rented out and I am waiting until summer to buy a new place.  So every tool I own is in a box somewhere.  To make this kit I needed to use only tools I could buy inexpensively or could borrow.

The most important item is something to hold the circuit board.  This is something I couldn't borrow and was the most expensive item to buy.  Since I don't already own one it was not a foolish expense but at $70 was the most expensive single item.  It is a Panavise model 324 electronic work center.  After having used it I would say that the most useful feature is the parts tray base and the board holder.  But they are also expensive enough by themselves that even if you throw away the soldering iron and solder roll holders it would still be cheaper than buying the pieces separately.

The next most important item is the soldering iron.  For electronic work you want something in then 25-30 watt range.  I chose a Radio Shack 15/30 watt switchable.  Would have preferred a Weller Iron but when I went to Fry's the soldering iron section looked like it had just been visited by the Huns the only stock on hand were some very sketchy chinese irons and a few Weller Irons that were simply too large.  I bought nothing and left most dissatisfied.  Instead I reluctantly went down the street and spent $50-60 at Harbor Freight and another $60 at Radio Shack.  

The other items are all fairly basic hand tools that can be pruchased almost anywhere.  For the most part they were purchased at Harbor Freight.  Although cheap they seem to be ok except for the lighted magnifying glass.  It is simply too heavy to be supported by the neck joints of the neck.

Solder and the specialized soldering tools are Radio Shack.  I prefer silver solder it creates a better contact and just seems to work better for me.  Plus it's just not that much more expensive.  The only draw back is that the sizes available were very fine and that makes it a little more difficult to work with.

Finally the space is the kitchen table at my brothers house.  (Don't tell his wife)  Convenient to the bathroom, refrigerator, and 4 dogs who all like to demand attention when delicacy is required.


Armstrong Twin #2


The first step was fairly simple.  Paint the enclosure.  Used Krylon Primer (3 coats), Gold (5 coats), and Gloss Clear Coat (3 coats).  Plus my primitive Sharpie applied graphics.

Using spray paint is one of the easiest ways to apply paint to metal.  But it is easily screwed up as well.  The trick is to paint multiple thin coats using 2-3 second bursts as you sweep the piece with the paint.  

Optimally the work piece should be suspended on a wire or hook to get the best coverage and prevent sticking.  That was not an option for me so I improvised a spray box out of a used cardboard box.


Build your own clone Armstrong Twin Project

Saw an article in Premier Guitar a few months ago about this company that designs and sells guitar stomp box kits.  I have been wanting to make my own effects for some time now and was inspired to give it a go.  This series of entries will chronicle my efforts in constructing a BYOC Armstrong Twin kit.

The Armstrong Twin is BYOC'c version of the Dan Armstrong Orange Squeezer combined with his Green Ringer.  The originals were manufactured in the mid-seventies and have been long out of production.

The Orange Squeezer is a basic compressor.  The Green Ringer is a ring modulator although it is said (I have no idea personnally) to sound more like an Octavia.